How To Dab Cannabis Concentrates
Dabbing may seem daunting at first, but it’s one of those activities that comes easily once you’ve seen it done, so in an effort to avoid having your first time go better than mine, today you’re going to learn how to take a dab.
Mar 19, 2016
I (sort of) remember my first dab. I had only smoked flower and hash before, so the number of tools and steps laid out before me seemed like a lot to handle (and I wasn’t even stoned yet!).
Dabbing is basically the flash vaporization of cannabis concentrates once applied to a hot surface and inhaled. These concentrates (you’ve maybe heard of shatter, wax, BHO, oil, etc.) are a lot more potent than marijuana flowers, so a little bit goes a long way. While bud tends to test between 10 to 25% THC, concentrates typically range between 50 to 80% THC, depending on the extract type and quality. You can even dab non-psychoactive CBD extracts for quick therapeutic effects with little to no cerebral euphoria, but in some regions these oils can be difficult to find.
However, dabbing isn’t for everyone, especially if you’re new to cannabis entirely. The dosing process is more delicate, but once you’ve gotten the hang of it, concentrates can offer you new heights of physical relief and unique cerebral effects. Extracts also contain a lot less plant material than flower, so you’re inhaling more cannabinoids (e.g. THC, CBD) and less combusted resin.
What Tools are Needed to Dab?
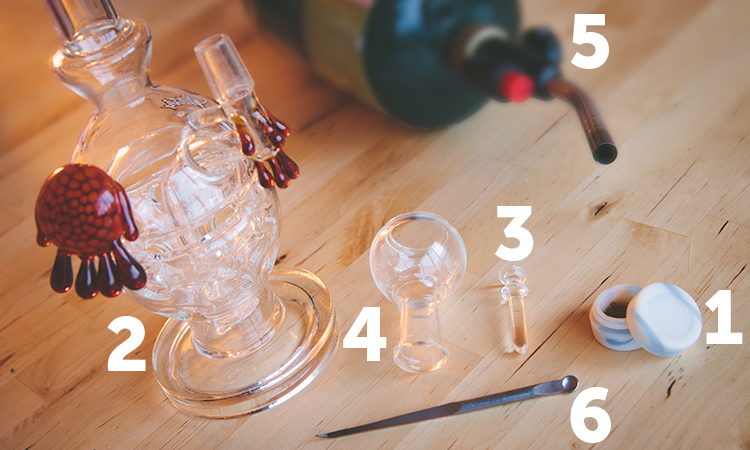
Dabbing technology is evolving, but the traditional setup includes the following items (keep in mind that the appearance of each tool may vary slightly depending on its design):
- A cannabis extract. These come in a variety of forms, but the most common ones used for dabbing are BHO, CO2, and solventless extracts like rosin. Don’t dab with alcohol-based extracts, and if you have any doubt at all about the safety of dabbing a particular oil, ask your budtender.
- A water pipe. You can take the glass bowl pieces out and replace them with dabbing attachments to turn your pipe into a dab rig.
- A nail. Find a nail that fits your water pipe’s gauge. Some are made of ceramic and quartz, but titanium is the most commonly used type.
- A dome. This is the glass hood placed around the nail. “Dome-less” nails (see below) don’t need a glass globe, but standard nails need something to trap the vapor before it’s inhaled.
- A torch. Mini-torches used for crème brulee will do the job, but some choose to upgrade to larger propane-fueled torches that heat nails faster. New flame-less methods of dabbing are becoming available, but most people still use the torch method due to the low cost investment.
- A dabber. This is the glass, metal, or ceramic tool used to apply a dab.
How Much Oil is Enough?
Different extracts have different THC concentrations, so it’s helpful to know how potent your oil is before dabbing with it. However, it’s generally recommended to start small and increase the dose if you feel comfortable doing so.
A small dose is no bigger than a crumb. It may not look like much, but that’s still a lot of THC going straight to the dome at once. Dabbing can feel a lot more intense to those accustomed to flower, but as your tolerance adjusts, the effects become less jarring.
How to Take a Dab
Once the rig is set up and your dab is prepared on the dabber stick, you’re ready to get started. We advise you to sit while taking a dab, since the rush of THC can be physically intense.
Step 1: Turn on your torch and aim the flame directly at the nail. Most people will heat the nail until it begins turning red-hot. If you’re using an electronic nail, refer to the section below for more information on heating.
Step 2: Once the nail is hot, turn off your torch and place the glass dome over the nail. It’s recommended to let titanium nails cool for about 10 seconds and quartz nails about 45 seconds so the surface temperature isn’t too hot. Refer to this article to learn more about the importance of low-temperature dabbing).
Step 3: Take your dabber, apply the dab directly on the nail inside the dome, and inhale slowly. Rotating the dabber tip on the nail can help you prevent wasting any oil stuck to the dabber.
Step 4: Exhale and enjoy!
Safety notice: nails and glass domes become extremely hot in the dabbing process. Take caution when handling them, and always wait for all pieces to cool down before you even think of touching them.
What Are E-Nails and Dome-less Nails?
The above tutorial explains how you take a dab using the common torch-and-nail method, but there are other dabbing attachments that deviate slightly from this process.
Dome-less nails are metal pieces that don’t require a glass hood to trap vapor. Instead, a network of holes throughout the nail deliver the vapor straight through the piece. You still heat it as you would a standard nail — the advantage is not having to hassle with an extra glass piece that can become hazardous with heat and sticky with resin.
E-nails, or electronic nails, are significantly more expensive than standard and dome-less nails, but the investment is often worth it for serious dabbers. They cut out the need for a dome as well as a torch, which is easily the most dangerous element of dabbing. Furthermore, you have full control over your nail’s temperature. This is a fantastic feature if you care about making the most out of flavors and terpenes when you dab.
Please feel free to contact us with your questions below or visit our Product Guide for more information on the most-trusted, healthiest and highest-quality products on the market.
Disclaimer
All information on this page is subject to MCDSA’s disclaimer.
